Thursday 16 December 2010

Planning location ideas for BLITZ

When we started planning our thriller we sent out some emails to different locations finding out if it would be possible to film there for a day:


Dear Sir/Madam
We are currently in the process of planning our AS Media studies coursework Thriller Sequence at Hurtwood House and while searching for locations we stumbled across Cane Hill Asylum. We researched it and found this website and were wondering if you could give us the details of the current owner as we were wondering if there was any chance we could possibly be able to use it as a film location for a day in January. There will be profesional teacher supervision aswell.
Many thanks in advance for any information you can give us.
Regards,
Charlie Manton, Sophie Greig, Catherine Ward Thomas
Hurtwood House
Radnor Lane
Holmbury St Mary
Dorking
RH5 6NU


However we heard no reply from Cane Hill, so moved onto other mental asylums. After phoning many of them up, we rang the Surrey County Council who told us that there would be too many insure procedures to complete if we wished to film in a derelict building.
At this point our idea once again took a turn as we decided on a plot change. Instead of setting it in Victorian times we moved forward 50 years to the era of World War 2 and took our young girl to a tube station. After contacting Aldwych Station we discovered that it would cost £250 p.h which we could not afford.


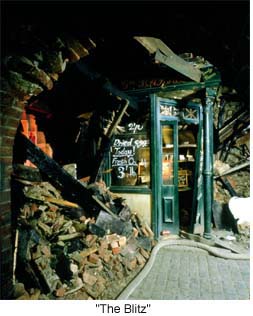
Our idea took another turn when we thought about other locations to film in and came up with the idea of using an exibhition at the Imperial War Museum:


Dear Sir or Madam,
We are currently studying for our Media AS level and need to produce a 2 minute opening sequence of a horror/thriller movie. We came across your 'Blitz Experience' exhibition and fits our theme perfectly. We were wondering if it would be possible to film there for a day in early January. We understand that it costs £150 p.h, however as we are students we cannot afford a morning's worth of filming there. Would it be possible to reduce the price to allow us filming there for around 4 hours.

We have been planning an opening sequence revolving around one 8 year old girl who has lost her mother in a bombing, we would like shots of her wandering around the bombed streets of London after the bombs have dropped. Is there any way of getting these shots without paying the full price? After our exam we would be happy to offer you the footage we shot and the finished sequence if it is any use to you.

Many thanks,
Sophie Greig


Media Studies Dept.
Hurtwood House School
Radnor Lane
Holmbury St Mary
Dorking
Surrey
RH5 6NU
The museum replied with this email:
 
Dear Sophie,
Thank you for your email, as filming would take place outside Museum Opening Hours (before 10am or after 6pm) we do need to cover costs to keep the Museum open, including staffing costs. Our standard filming rate is £450 per hour which we reduce to £150 per hour for students and we would not be able to reduce this costs any further.
Please do advise if you would like to go ahead with the filming and I will be happy to investigate available dates.
Best wishes,
Debbie
Debbie Dowden
Events Officer

Imperial War Museum
Lambeth Road
London
SE1 6HZ

Tel: 020 7416 5393


Once again,  the price was too high to be able to film at this location. So we settled for using our studio at school and placing our thriller sequence in an old bomb shelter, in both the past and the present day.
After these many attempts of finding a location to film in, we came up with our final idea of BLITZ.

Shot List for BLITZ

Tracking shot of bunker

Close up on posters

Close up on foods

Tracking to desk

Close up on newspaper and leaflets

Close up on chair and gas mask box

Cut to bed/feet Panning shot up girl’s feet

Pan up her body

Pan up to her head and over her shoulders

P.O.V shot of her writing

Extreme close up of diary

Wide shot of girl looking around

Close up of her shuffling back to bed

Cut to black

Medium shot of breaking through of bunker

P.O.V shot of torch sinning round

Close up of propaganda poster

Close up of books

Wide shot to see ghost

Medium close up of bed

Close up on diary

Over shoulder shot of man reading diary

Cut to book falling off shelf

Cut to over shoulder shot of man reading diary and ghost appearing in front of him

Cut to extreme close up of little girl

Cut to black

Black frame

BLITZ.

BLITZ Shooting Script

INT: Tracking shot: Dimly lit: The frame focuses on an underground cellar like bomb shelter in 1940. We track across various props from the era, for example, we see some shelves filled with tinned food, cereal boxes etc. We track across to propaganda posters on the wall; we pan across to a set of shelves where we track across boxes of food and tins. We pan down to a small table where we see a radio which we hear playing a speech of Churchill, some leaflets, ID cards, letters, ration books and newspapers. We track across the newspaper to see headlines of events that have happened in the war. We then track across to the bed where we see a little girl writing in her diary looking bored, but occupying herself.

Cut to a POV shot of her writing in her diary, this shows the audience the date. We then cut to a shot of the side of her diary showing her hand writing, lots of rough and sketchy pen movement is shown over laying each other to create a jagged and un-settling atmosphere.  We hear the sound of distant footsteps getting closer, and then the young girl is seen looking scared and shuffling to the end of her bed, hugging her knees screaming

Hattie:
‘No, No, please no’.

A bomb sound effect is heard. We then cut to black.
           
A few seconds pass until we hear the sound of someone breaking in to the shelter. A sliver of light is shown inside as the doorway breaks open.

INT: Tracking shot; Lit by torchlight. We see the bomb shelter from the previous sequence covered in cobwebs and some items have fallen off the wall. A man walks around the shelter his torch focussing on certain items. He starts off by looking at the shelves and the books on the shelves, then through the food and down onto the leaflets on the table. He leans over to a shelf to pick out a book and lets his torch hang by his side for a brief moment. In this moment we see the flash of a ghostly figure before he shines his torch around. He passes to her bed where he sees the diary she was writing in. He flicks through some pages before hearing a brief noise and shining the torch around the room. A book is seen to have fallen off the shelf and as he looks back to the diary the little girl appears right in front of his face.

Cut to black. White type writer letters of B L I T Z. Appear against the typing sound effect and some eerie music.

Storyboarding for BLITZ


Here are some pictures of our stroyboards for our chosen idea and choices of shot.

Wednesday 8 December 2010

BLITZ.

Here is a slide show of the basis idea's of our opening sequence.

Saturday 20 November 2010

AS Thriller / Horror Mood Board ideas

This is a mood board which is used to help create idea's and themes for a certain project. For my mood board i was focussing on thriller and horror images. I used pictures of evil looking people, which then lead to places, whcih then generated into an idea about dolls and doll houses, whcih turned into an idea about strategy, so i included pictures of chess, runes and stonehenge. These images lead me to a slide of victorian images. Finalising on a slide of old steam trains.


Thursday 21 October 2010

What is a Thriller?


Thriller is a genre of literature, film, and television that uses suspense, tension, and excitement as the main elements. The primary subgenre is psychological thrillers. After the assassination of President Kennedy, political thriller and paranoid thriller films became very popular.

The brightest examples of thrillers are the Hitchcock’s movies.The cover-up of important information from the viewer and fight/chase scenes are common methods in all of the thriller subgenres, although each subgenre has its own characteristics and methods.

Common methods in crime thrillers are mainly ransoms, captivities, heists, revenge, kidnappings. More common in mystery thrillers are investigations and the whodunit technique. Common elements in psychological thrillers are mind games, psychological themes, stalking, confinement/deathtraps, horror-of-personality, and obsession.

Elements such as conspiracy theories, false accusations, paranoia, and sometimes action are common in paranoid thrillers. some argue, though, that the thriller genre is simply a pseudonym for the horror genre, both using suspense and atmosphere to cause feelings of dread in their audiences.


"Homer's Odyssey is one of the oldest stories in the Western world and is regarded as an early prototype of the thriller."  A thriller is villain-driven plot, whereby he presents obstacles that the hero must overcome.

The thriller genre can include the following sub-genres, which may include elements of other genres:
  • Conspiracy thriller: In which the hero/heroine confronts a large, powerful group of enemies whose true extent only he/she recognizes.
  • Crime thriller: This particular genre is a hybrid type of both crime films and thrillers that offers a suspenseful account of a successful or failed crime or crimes.
  • Disaster thriller: In which the main conflict is due to some sort of natural or artificial disaster, such as floods, earthquakes, hurricanes, volcanoes, etc., or nuclear disasters as an artificial disaster.
  • Legal thriller: In which the lawyer-heroes/heroines confront enemies outside, as well as inside, the courtroom and are in danger of losing not only their cases but their lives.
  • Mystery thriller: Suspense films where characters attempt solving, or involved in, a mystery.
  • Political thriller: In which the hero/heroine must ensure the stability of the government that employs him.
  • Psychological thriller: In which (until the often violent resolution) the conflict between the main characters is mental and emotional, rather than physical.
  • Supernatural thriller: In which the film brings in an otherworldly element mixed with tension, suspense and plot twists.


Although most thrillers are formed in some combination of the above, there are some however that are formed with other genres, which commonly are the horror genre, spy genre and the action/adventure genre.

Preliminary task final sequence

Wednesday 20 October 2010

Preliminary Task Post Production


After shooting our preliminary task last week I have now learnt how to access my footage from the final cut server. This is done by selecting the server and the footage, then clicking check out to take it out of the server and putting onto the desktop. We also learnt the purpose of continuity editing, which means making the sequence as easy for the audience to understand as possible, the scene needs to be smooth and flowing to ensure that the story line is clear. The montage technique relies on symbolic association of ideas between shots rather than association of simple physical action for its continuity. In terms of our scene, when the male character keeps encouraging the female character to do something, we made sure we included a shot of the keys to show the audience what the scene was really about. We also had to make sure that if one of our actors rolled up their sleeves, they would be the same for the next shot.

We started out the editing process by entering the Rushes bin where the raw footage is kept; we then opened this in Final Cut Pro to begin editing. We then went through each shot and chose the best of each and placed them in the log bin; where all our chosen shots are kept. We made decisions to select or reject the different shot choices to make sure that our scene was smooth and also to check that the any errors had been rejected. We needed to find the shot that fitted best with our other shots for the sequence. We had to choose shots that had suitable eye line matches with others, shots that ran smoothly without any bloopers and shots that had clear sound and good lighting; we also had to choose shots that we all liked.

We then had to organise our shots. We needed to choose which shots were selected to best tell the story of the scene, also to influence the audience to take sides with a certain character. We had to make sure we followed our story board to ensure that the story line was clear for the audience to understand. Another choice we had to make when organising our shots on the time line was to make sure each take had an eye line match between the characters, if it didn’t the audience would find it confusing to understand who the characters were talking to as the continuity would be messed up. By giving the male more screen time and always looking up to him the audience feel intimidated just like the female character. We always see the female character sitting down; we also angled the camera to look down on her to put her into victim status. The extreme close up of the female character allows the audience to fully connect with her emotionally. Even though we privileged the male character with more close ups we wanted the audience to see him as ‘evil’ by how we placed him in hero shot and the female in victim status, the final shot of the sequence was of the female character looking down sadly, making the audience feel sorry for her and take her side. We then had to focus on the shot order to make sure that the sequence had continuity and made sense. We had to make sure that the wide shot was at the beginning to make sure the audience understood the location when we changed to close ups of the characters. We also needed to place our shots into an order on the timeline to check that they fitted together smoothly without pauses in the middle of the sequence as we changed take.

Editing in final cut – We chose to cut from a wide shot of the male character leaving the room to an extreme close up of the female characters eyes to fully understand her emotion and to allow the audience to connect with her, encouraging them to be on her side. Another editing choice we made was to cut to a shot of the keys whilst the male character was talking to show the audience what the entire conflict was about, making the continuity and flow of the scene clearer.

Wednesday 13 October 2010

Preliminary Task Evaluation


Last Friday we began filming our preliminary task shoot. We filmed for an hour in the media class room which had many advantages and disadvantages. It worked as a location for our task as we had easy access to desks for props and also doors and exterior shots for scenery. However the disadvantages of this were that there was not much space to move around in and also the scene did look a little like it was taking place in a class room. During filming we each shared out the roles equally and in a rotation. So for one shot someone would be directing, another would be operating the camera, someone would be checking continuity and the fourth person would be checking off a list of things to be done before filming. I did all of these about two times each and found I learnt a lot from each of them. When I operated the camera I learnt to white balance and also zoom and focus. When I was directing I learnt all the terms of filming and put them into action. For continuity it required a lot of focus to remember how things were in the previous scene, the check list was really important to make sure our take went smoothly.

When it came to lighting we wanted to make shadows to create a spookier and intimidating atmosphere. We wanted harsh lighting to cast across our actors. This was important to the scene as it made the male character seem more dominating and vindictive, whereas the female character was seen as smaller and more nervous. It was effective as it really helped create our wanted atmosphere and helped show the characters of the scene. We used blonde lights to create the lighting and turned off the overhead lighting to balance it.

When it came to filming we had a lot to remember from our practice of the shoot. We remembered to set up the tripod correctly and bubble it to ensure the tripod was level. This is very important when filming on location to ensure that the camera is level and steady and not tilting to one side. We made sure the shot was framed correctly each time making sure the special relationships were accurate and remembering to include the rule of thirds and eye line matches. We had to make sure that our lighting equipment was not in shot by moving around them remembering them 180’ rule and not losing our way of how we wanted the scene to be lit. We then had to choose the appropriate angles for the shot following the guideline of the story board. This was important to ensure that the frames flowed into each other and also to make sure that we didn’t break the 180’ rule or the line of action. When we began filming we started off using a wide shot to have both characters in the same shot, then we moved to an over the shoulder shot of the male character and filmed this, we then zoomed into the male character and filmed his close up, after this we moved the camera around to film the over the shoulder shot of the woman and then her close up. We did two correct takes of each shot to make sure that we had variety when it came to editing. After the practice shot the week before we had to remember not to cross the 180’ rule. We made many notes to ensure that we kempt to it to make the scene flow more and also to keep the line of action. Before recording each shot we used the appropriate terminology for example ‘stand by’ ‘standing by’ ‘roll camera’ ‘camera rolling’ ‘action’ ‘cut’ leaving a lead in and lead out in the recording to help us when we came to editing. By doing this we everyone on the set knew what was happening, it also made the atmosphere on set seem more professional. We were able to film extra shots away from the storyboard like an establishing shot of the building and a close up on the main prop of the keys and an extreme close up on the eyes of the victim making her look more scared and also more threatened.

Overall we have learnt a lot from the practical lessons of film making. We worked really well as a team and were able to agree and equally disagree together making the whole process of filming much easier and calmer. I have personally learnt a lot about what happens on set about filming for instance with the appropriate terminology and lead in and lead out. I also learnt how to set up the camera in terms of bubbling and frames. Another thing I learnt was the importance of the story board and how useful it is to help the shot flow.


Thursday 7 October 2010

Pre-Production Planning For Our Pre-lim Task

When it came to planning our preliminary task, my group and I had to think of a senario for the basic script that we were given. We also had to think of props we would need, cast, costumes and a location.

We first of all chose to put the script into the scenario of a car robbery. The script really allowed us to do what we wanted with it; a car theft seemed like an idea that no one else was doing with the script. It could be interpreted in it's own way but the basic idea was given.

As the idea was based around a car theft, we knew that we would need keys to represent the car. We also decided on a stack of documents that someone could be sorting through, these represented the information of the owner of the car.

We wanted a man and a women to make up our cast. We chose a man to be the character to encourage the theft, this was more stereotypical as he was looking down upon the woman - we thought that we could use a hero shot of the male to show his dominence and then look down on the woman to place her in victim status.

We werent sure where to place our film. In the end we were given a classroom to film our sequence in.

Wednesday 6 October 2010

Using a video camera

This week we have been learning about how to correctly use the cameras.

We started off by learning how to set up the tripod, including bubbling, setting the height and securing the camera. To bubble the tripod we had to adjust the levels and make sure the bubble in the spirit level was in the centre of the selected circle. Using a tripod has benefits including creating a steady shot and also keeping it very still. However you can also work the camera from handheld, with is beneficial when wanting to create a unstable view for the audience.

We then learnt about the different functions and options of the camera. We first learnt about the time code, how film is measured in hours, minutes, seconds, and then how many frames have been shot in a 25th of a second. We then learnt to white balance by placing a white piece of paper a few inches in front of the camera to set the colours for the shot. Aperture settings taught us how much light was getting into the camera, the bigger the hole the more light will enter meaning it will become more exposed, the smaller the hole means the less light making it under exposed. We learnt to focus by zooming in on the shot fully and then focussing by twisting the focus wheel until it was clear and focused before we zoomed out to the shot we wanted.

Then we moved onto basic filming skills such as camera shot types. We learnt about the differences of close ups, long shots, medium long shots. We also learnt about the rule of thirds and how to place a shot into the rule. When having a close up of a person you need to include head space and make sure the spaces in the shot are equal. We need to remember continuity to make a cut between shots look seamless and flowing. Like if your hair is behind your ear in, in one shot and then not in the next it will look stilted.

In our practice shot we made many mistakes by crossing the 180’ rule. We didn’t think about this whilst filming so when we came to look at our takes the sequence was stilted and confusing. Our close ups were also shot from the side and not directly on. When we come to shooting again we will remember to set up the 180’ rule and not cross it by making sure that each actor is on the right side of the camera. We will also re-place our camera for the close ups.
 

We were also taught some film making terminology:
STAND BY / STANDING BY - readys everyone into position for the take. The AD calls STAND BY and the response tells them that everyone is prepped
 TURN OVER / TURNING OVER (Roll film/Rolling etc) The director tells the camera operator to start filming - a few seconds of film is then run as the camera gets up to speed - this is often referred to as LEAD IN. Once done the Camera operator will respond TURNING OVER or ROLLING (etc) to indicate being up to speed
 ACTION! - Cue for the actors to perform the take, and the crew to do their jobs. It is good practice for the Director to let the film run on a further few seconds after the take is completed before cutting - this is referred to as LEAD OUT
 CUT! - Cue for the camera to stop running film. Industry practice expects that the camera operator does not CUT before being told

The move from taking still camera shots to using a video camera was fairly simple but the setting up of the camera and tripod was a little confusing at first as there was so much to do. Setting up a still camera is different as you only need to hold it with your hand for most shots whereas for the video camera you need to put it on a tripod for most shots. They are similar in the way they both have aperture and focus.


Saturday 2 October 2010

Storyboarding

Storyboards are graphic organizers such as a series of illustrations or images displayed in sequence for the purpose of pre-visualizing a motion picture, animation, motion graphic or interactive media sequence, including website interactivity.
 
The storyboarding process, in the form it is known today, was developed at the Walt Disney Studio during the early 1930s, after several years of similar processes being in use at Walt Disney and other animation studios.
 
A film storyboard is essentially a large comic of the film or some section of the film produced beforehand to help film directors, cinematographers and television commercial advertising clients visualize the scenes and find potential problems before they occur. Often storyboards include arrows or instructions that indicate movement.
 
Here is an example of a storyboard:
File:Taco shell loofa.jpg

Wednesday 29 September 2010

Using Photoshop

Adobe Photoshop is a graphic and picture editing tool. It enables the user to alter, manipulate and create images either from existing photos or found images.

Tools we have learnt to use:

Clone stamp tool - makes a perfect copy of a highlighted part of the image. I got the hang of this tool pretty quickly, remembering to press 'alt' key whilst clicking to select the distance of the clone stamp.

Marquee Tool - cuts box shapes around a part of the image. This tool was very easy to use and i had no difficulty using this tool.

Burn Tool - This allows us to make a certain area or object darker. I learnt to use this tool towards the end of the session on Photoshop, on my photo I wanted to add a dagger to the picture so used this tool to give it some shadow.

Perspective Adjustment - This allows us to change the perspective of an object, for instance in my picture i wanted to add the knife however it didn't really fit so i change the perspective of the knife to make it look more like it was in the pictre and not just a layer.
The eraser tool - Allows us remove and erase certain parts of the layer on Photoshop. This was a little difficult to use when needing accuracy, as I had to keep changing the eraser size.

Text tool - this taught me how to add text to an image, this would be useful to add slogans or titles to an image. I wanted to add a title to my movie poster, so this was very useful as it still left the background around the text and didn't give a white box surrounding the text.

Lasso tool - this enables us to cut around a certain object exactly as we want it, if we hold down the 'alt' key we are able to make the process easier by being able to click to get a smoother and clearer outline. This took a very steady hand and practice to become good at.

Blur tool - this allows us to make sharp edges slightly more smooth and realistic, this is useful after copying a lasso layer. I used this after i had added a lasso layer to my image to stop the edges looking un- real and also to make the photo look more life like in general.

Move tool - Allows us to move an object around the layer. I found this easy to use when i remembered to always make sure I was moving the correct layer of the picture.

Crop tool - this enables us to cut down an image to how we want it. This was useful to me as I was able to change an image about when and how I wanted.

When I created my movie poster I used the knowledge that i had gained from the past Photoshop sessions to help create an effective poster, when I thought about the rule of thirds I decided that the first thing that I wanted the eye to see was the ghost, so I placed this in the  first third. Then I wanted to see the dagger which would happen through the fact that the eye would move down the ghost to the dagger then across to the dead body. This would direct the eye to the hand of the killer and realize that all three people are actually the same person and also the killer of the dead girl. Finally the hand would point the eye to the title of the movie.

I found using Photoshop rather easy and seemed to pick it up quite quickly. However there were elements of the program that challenged me. For instance using the move tool and making sure that I was on the right layer was very confusing and caused me to take a little time making some silly mistakes. The burn tool also took me some time to get used to as I kept forgetting what the image of the tool looked like. The tool I really enjoyed using was the clone tool as I felt it gave the best and sharpest copy of a certain image.

I see a great purpose of the use of Photoshop in media as it enables us to completely edit and alter the chosen image, for use in magazines this would be useful as you can completely change a picture or the model in it. Photoshop allows media to enhance pictures or edit them specifically. It allows us to make a person taller if they appear too short, or cut out something in a picture if it went wrong. Photoshop can brighten a sunset to make it look prettier, giving the audience a false idea of what the image is.

Wednesday 22 September 2010

Basic Stills Camera work and Composition

Composition:
Photography brings a visual language that is universal in understanding. We must then understand its vocabulary which consists of shapes, textures, patterns, lines, colours, shade of light to dark and sharp to blurry images. Just as we must learn to arrange words in a coherent order in order to make sense when we write or speak, so too must we put visual elements together in an organized manner if our photographs are to convey their meaning clearly and vividly.
Composition means arrangement: the orderly putting together of parts to make a unified whole; composition through a personal, intuitive act. However, there are basic principles that govern the way visual elements behave and interact when you combine them inside the four borders of a photograph. Once we have sharpened our vision and grasped these basic ideas of principles, then we will have the potential for making our photographs more exciting and effective than ever before.


One of the most popular 'rules' in photography is the Rule Of Thirds. Imaginary lines are drawn dividing the image into thirds both horizontally and vertically. You place important elements of your composition where these lines intersect. As well as using the intersections you can arrange areas into bands occupying a third or place things along the imaginary lines.Using the Rule of Thirds helps produce nicely balanced easy on the eye pictures.

Intoduction to Media Studies and My Doctor Who trailer

Trailer

Throughout this course i will be looking at learning the basic skills of media studies as a first time student. I will be looking at codes and conventions, analysing, TV Drama, how to work a video camera and edit a sequence together. I will first start off by making a preliminary task with a given script; to develop my understanding of using a video camera and editing the shots together. I will take this knowlegede into making an opening sequence of a thriller for my coursework.